


Over the past couple of months, I’ve been using Cline as an AI agent for coding.
I remember the first time I tried it — I was blown away by how effective it was and how much Cline understood and completed without my intervention. That’s something I’ve always struggled with when using Cursor.
In this article, I’ll take a look at how the coding agent Cline works under the hood to better understand what makes a production-ready AI agent. I always try to dig one level deeper into the tools and codebases I work closely with. This habit compounds over time, giving me a significantly deeper understanding of a project or codebase and helping me make better decisions in the long run.
Cline vs Cursor? Or Cline + Cursor?
Cline and Cursor aren’t mutually exclusive — you can use them together.
Why I like Cline:
Memory bank feature: This is the core reason it worked so surprisingly well. It allows the LLM to load all the relevant information about your project whenever you start a new task.
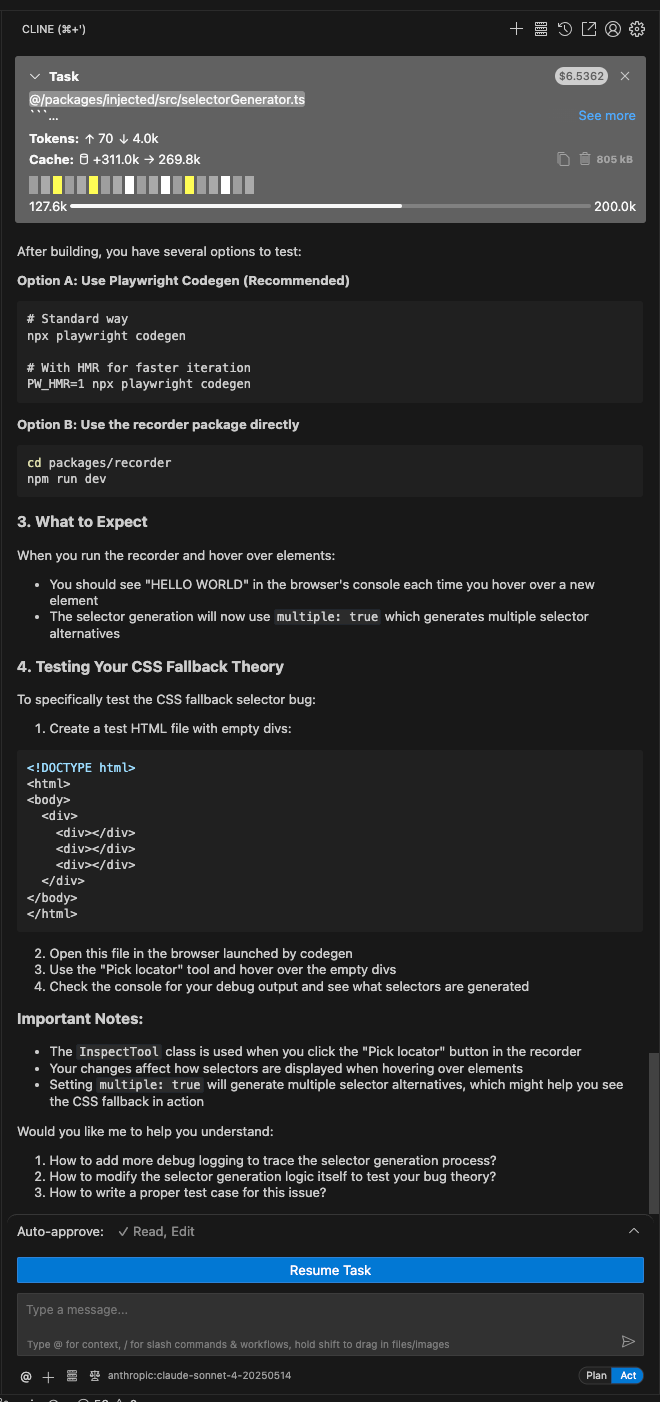
Visualized context window: As shown in the screenshot below, you can see how full the context is (e.g., 127.7K/200K). This gives you a clear idea of when the context becomes too bloated and it’s time to start a new session.
Plan/Act mode: In Cline, you’re automatically placed in the Plan/Act workflow. First, you define your task. Once Cline has enough context, it switches to Act mode and begins executing.
Model agnostic: You can choose any model you prefer. For Plan mode, I switch between o3, Opus, and Sonnet depending on the complexity of the task. For Act mode, I usually use Sonnet.
I still use Cursor often, mainly for its autocomplete model (e.g., via the Tab key) and for asking questions about the codebase. But when it comes to letting an agent operate more freely on the codebase, I prefer Cline.
The Tool System: Giving AI Hands
The Tool Definition Pattern
Cline’s tool system uses an XML-based format embedded directly in the system prompt. Unlike OpenAI’s API, which uses JSON-based function calling, this approach leverages the fact that LLMs are already trained on XML data.
Let’s walk through the complete flow from system prompt to file modification.
Step-by-Step Flow: From Prompt to Action
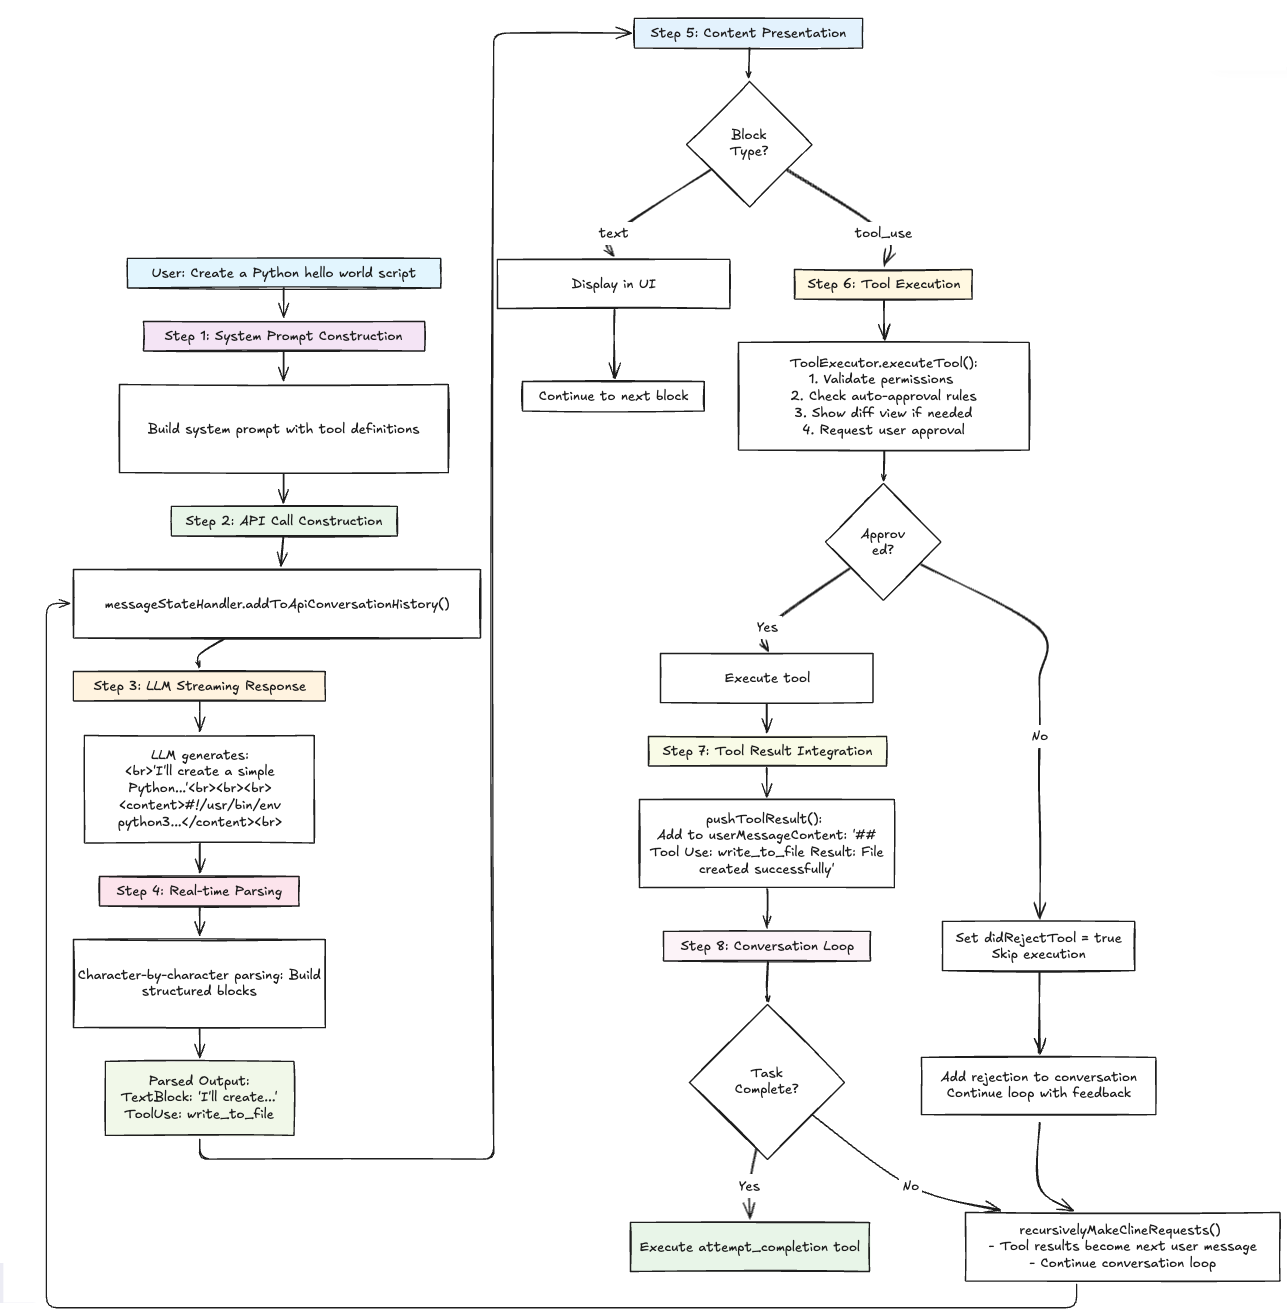
Step 1: System Prompt Construction:
When a user starts a task, Cline builds a system prompt that includes tool definitions:
// System prompt excerpt
`You have access to a set of tools that are executed upon the user's approval.
You can use one tool per message, and will receive the result of that tool use
in the user's response.
# Tool Use Formatting
Tool use is formatted using XML-style tags...
<tool_name>
<parameter1_name>value1</parameter1_name>
<parameter2_name>value2</parameter2_name>
</tool_name>
# Tools
## write_to_file
Description: Request to write content to a file at the specified path...
Parameters:
- path: (required) The path of the file to write to
- content: (required) The content to write to the file
Usage:
<write_to_file>
<path>File path here</path>
<content>Your file content here</content>
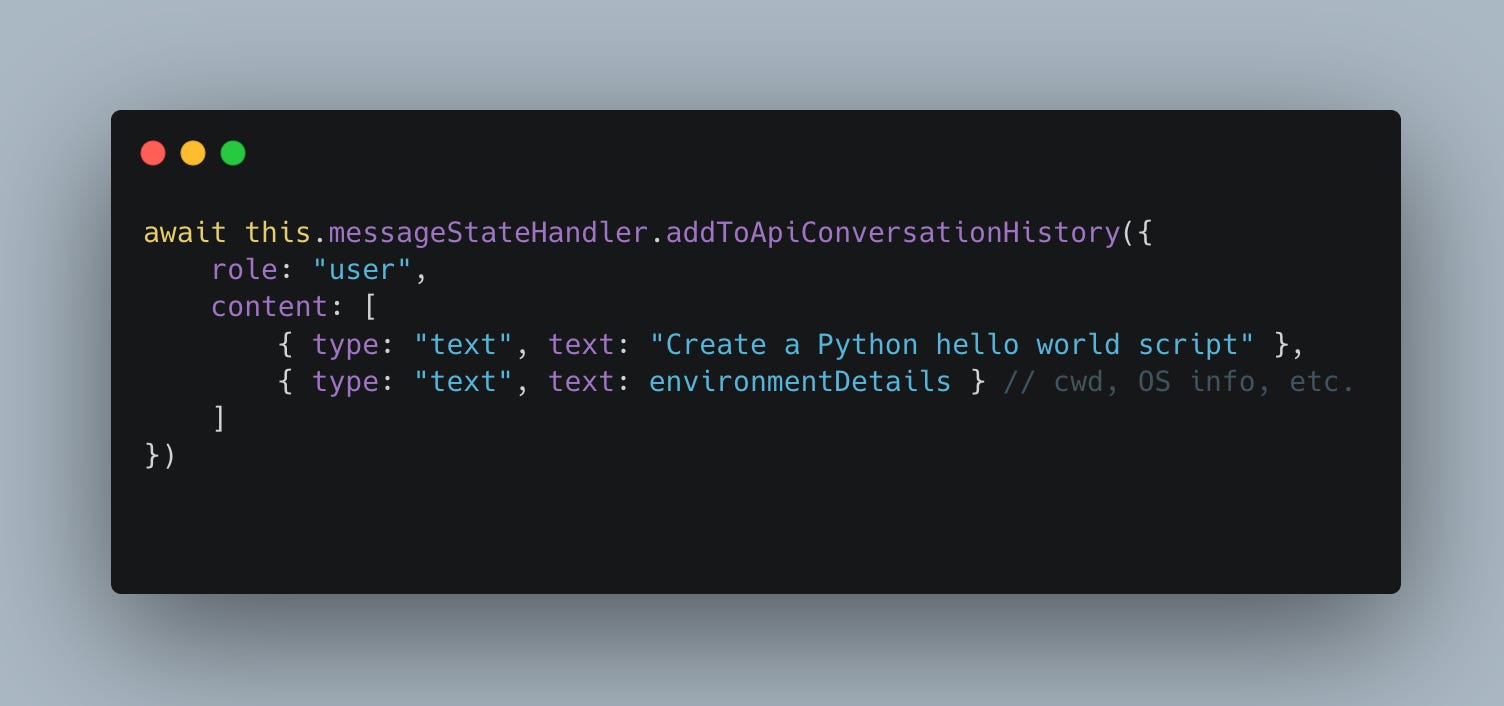
</write_to_file>`Step 2: User Request + API Call
The user initiates a task by making a request. For example, they say: “Create a Python hello world script.”
This request is then sent to the LLM along with environment details (such as current working directory, OS info, etc.):
Step 3: LLM Streams Response
The LLM processes the request and responds with both a textual explanation and a tool usage block:
I’ll create a simple Python hello world script for you.
<write_to_file>
<path>hello.py</path>
<content>#!/usr/bin/env python3
"""A simple Hello World script in Python."""
def main():
print("Hello, World!")
print("Welcome to Python programming!")
if __name__ == "__main__":
main()
</content>
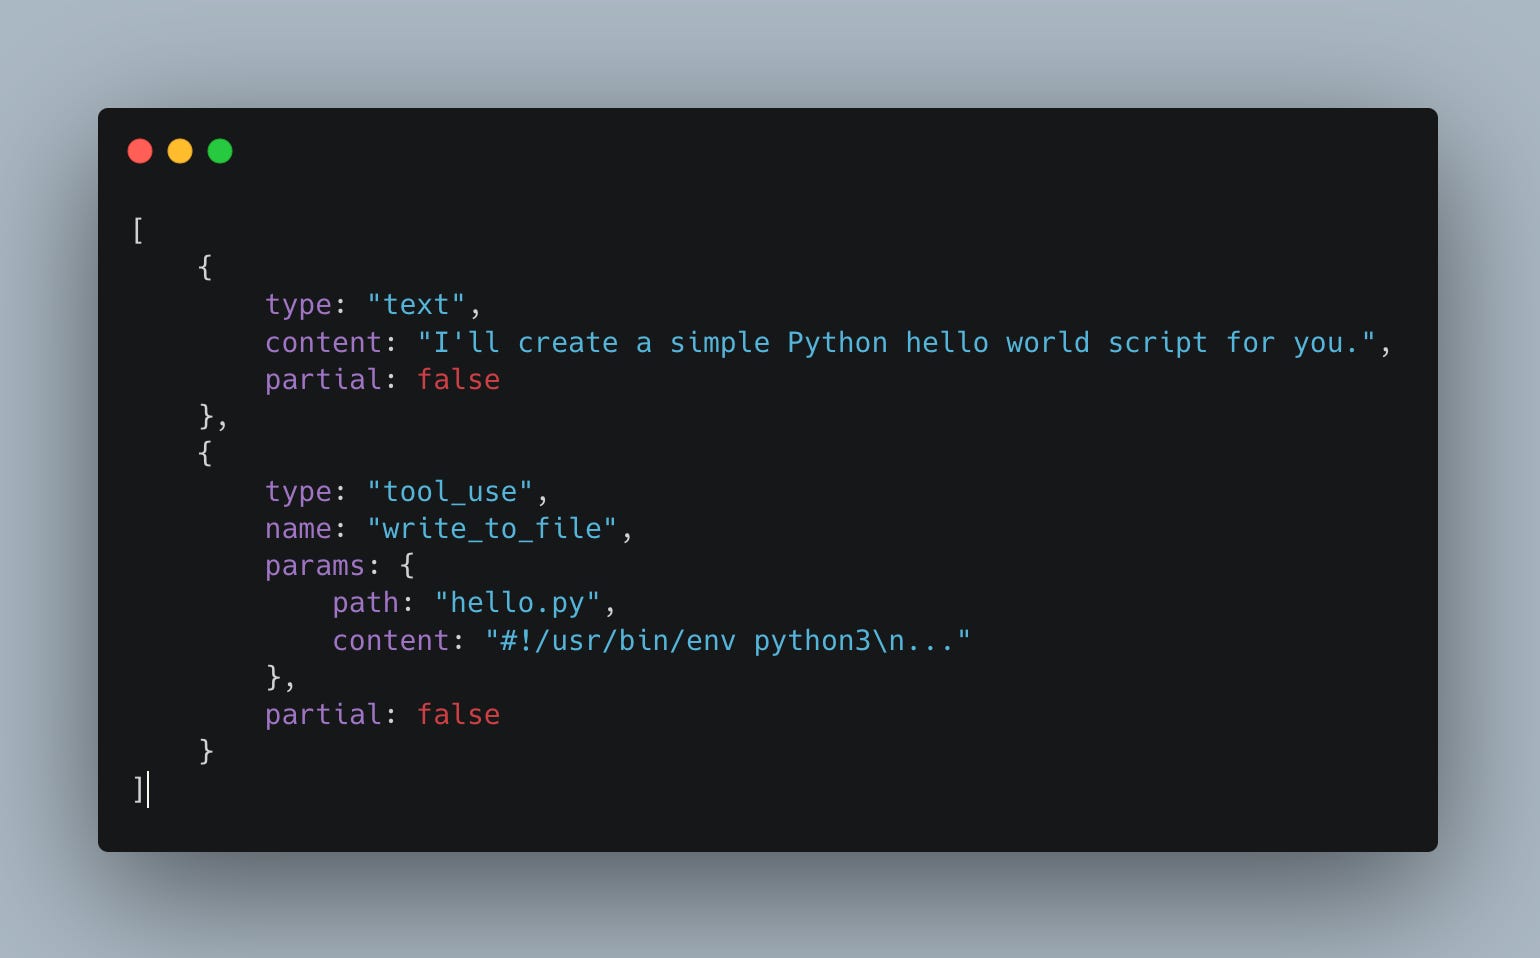
</write_to_file>Step 4: Real-Time Parsing
As the assistant’s response streams in, Cline parser it character by character to detect tool usage patterns:
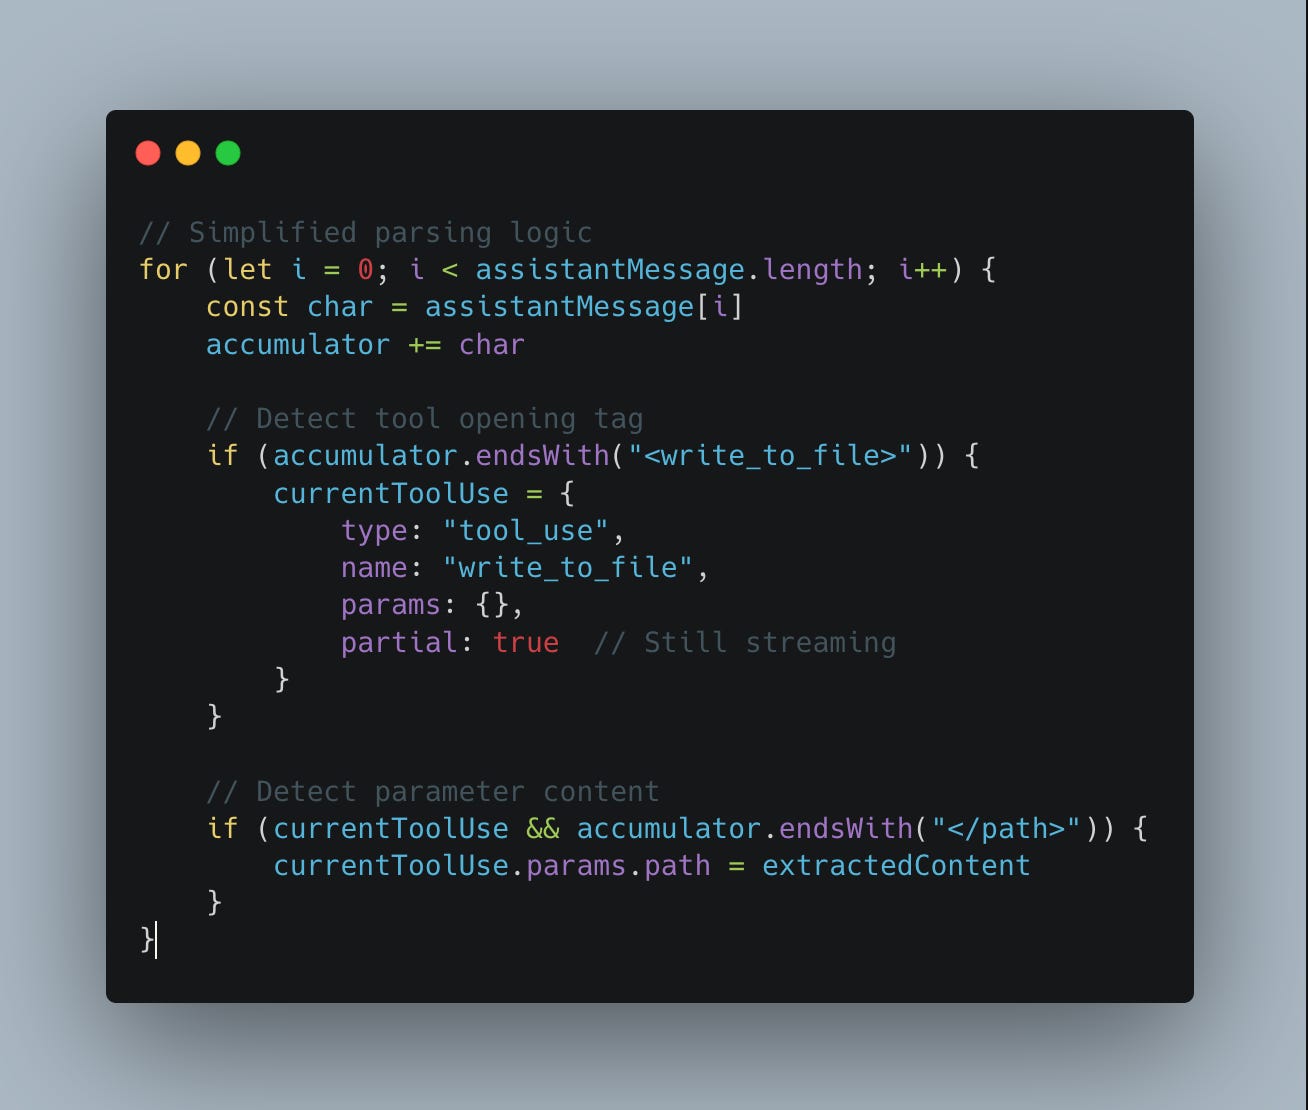
The parser outputs structured blocks like this:
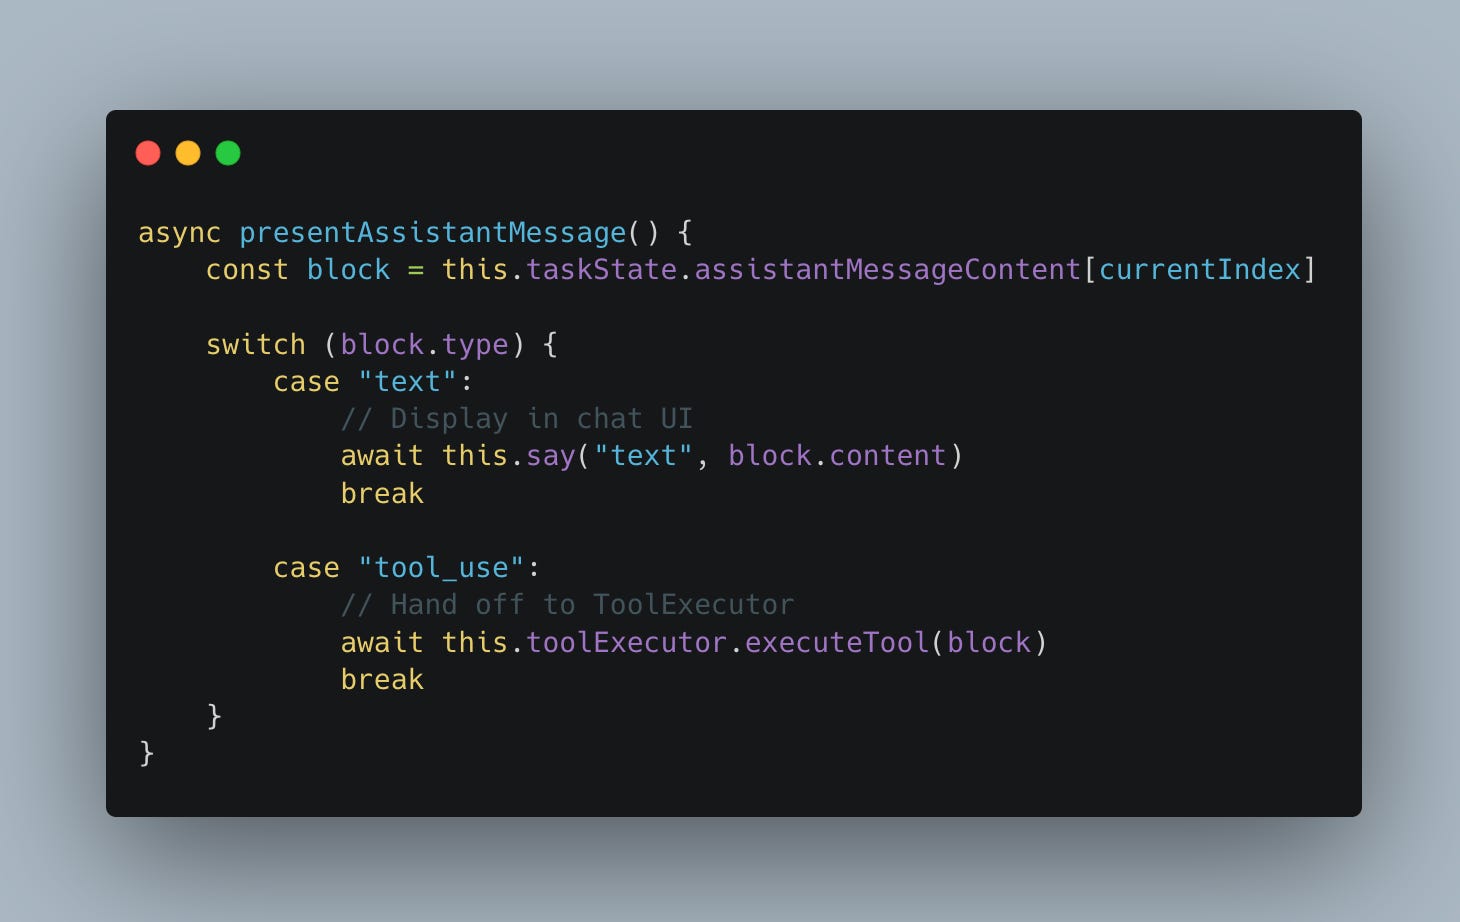
Step 5: Content Presentation & Tool Execution:
The presentAssistantMessage() method then processes each of these blocks accordingly:
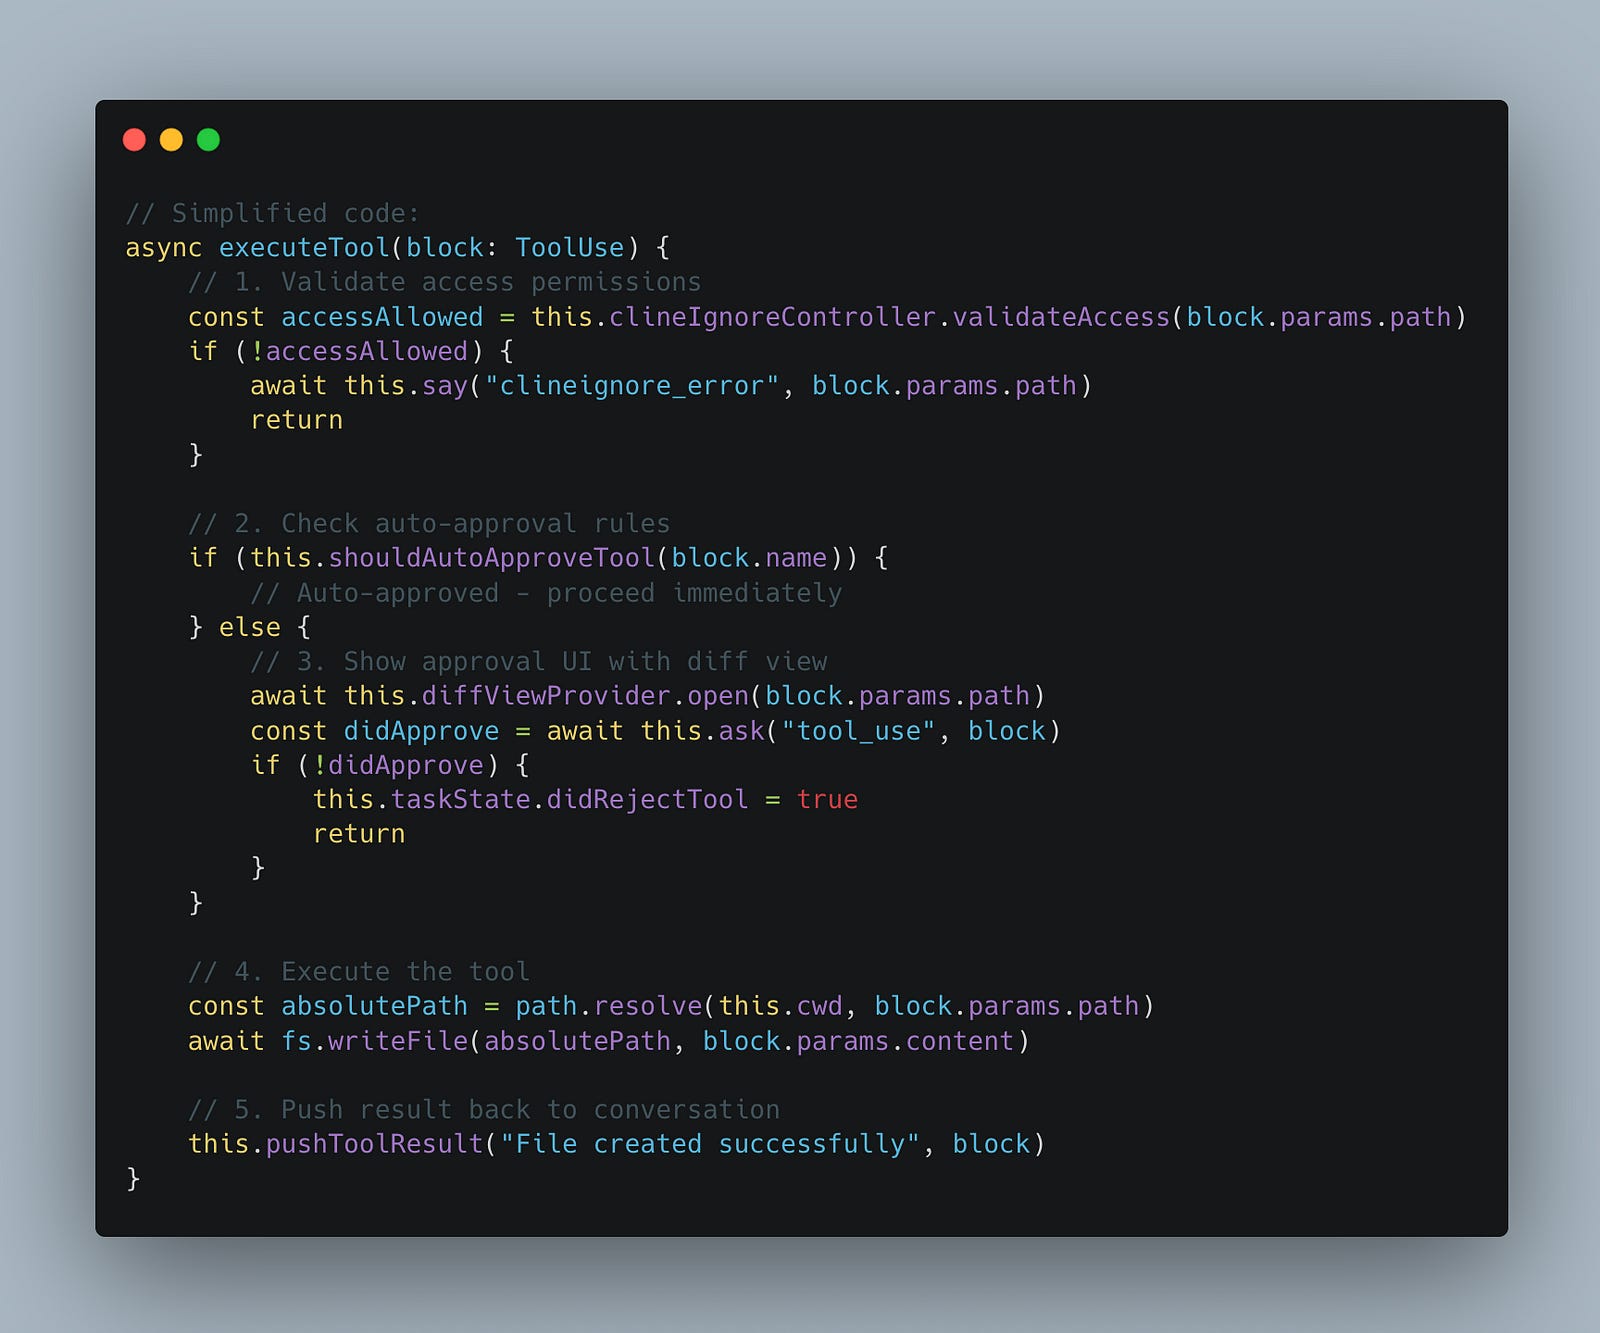
Step 6: Tool Approval & Execution
Before a tool is executed, Cline validates and optionally requests user approval through a safety flow:
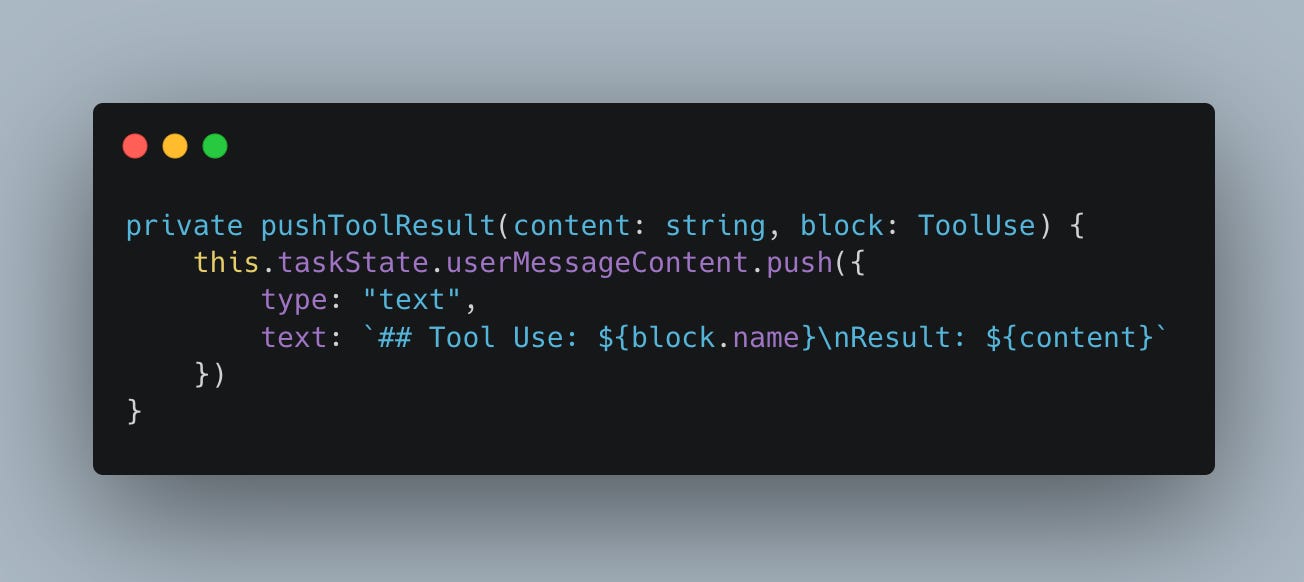
Step 7: Tool Result Integration:
Once execution is complete, the result is formatted and added to the conversation for transparency:
Step 8: The Conversation Loop Continues
This is where Cline’s magic happens. After executing a tool, Cline doesn’t stop — it continues the conversation loop
The Conversation Loop: How Cline achieves autonomy
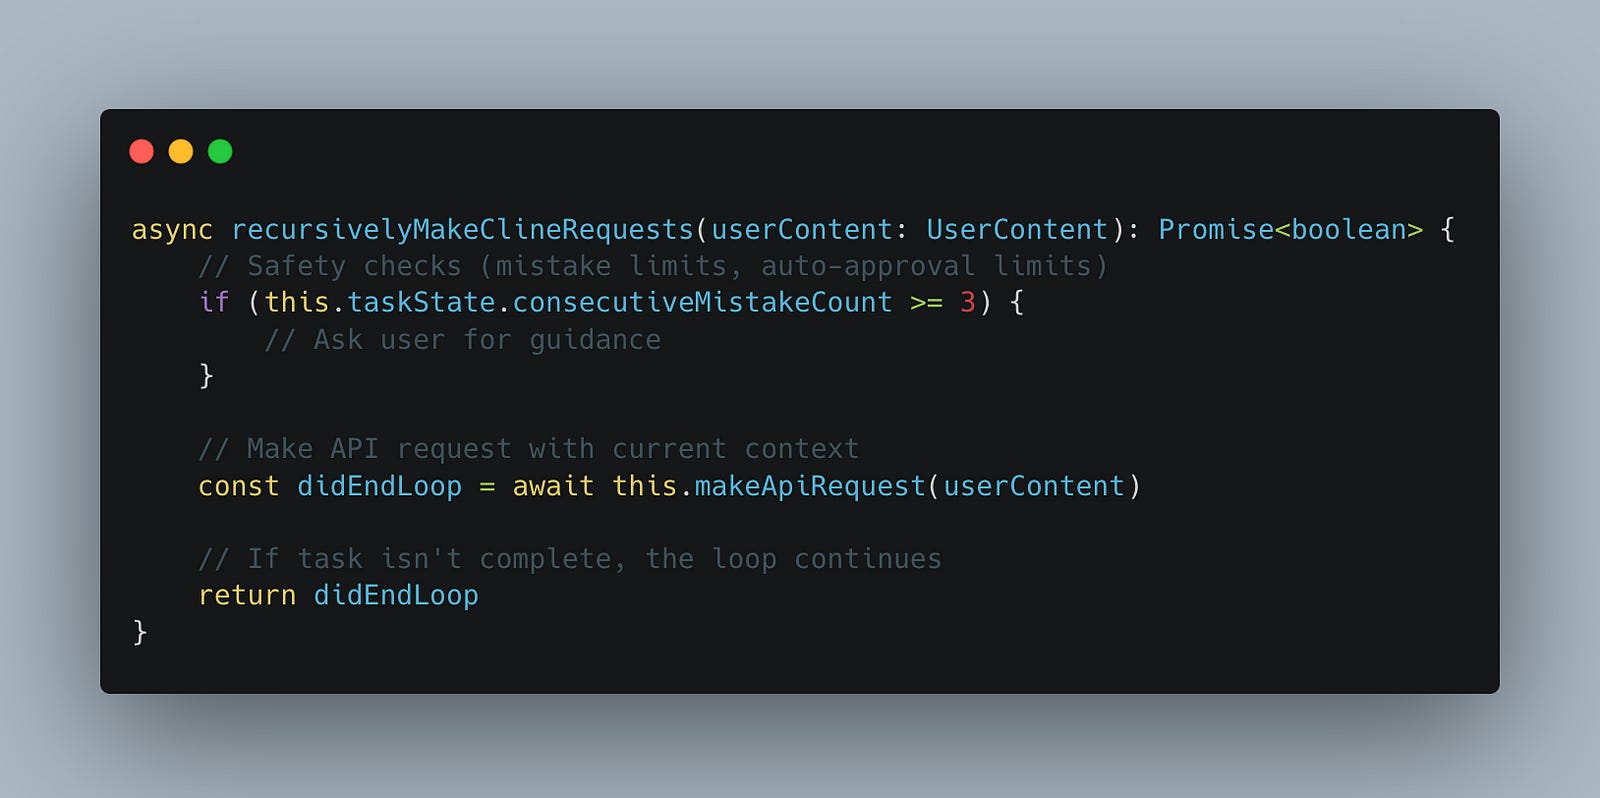
Let’s dive deeper into the conversation loop — the heart of Cline’s autonomous capabilities. This mechanism is what transforms Cline from a basic tool executor into an intelligent agent capable of completing complex, multi-step tasks without constant user input.
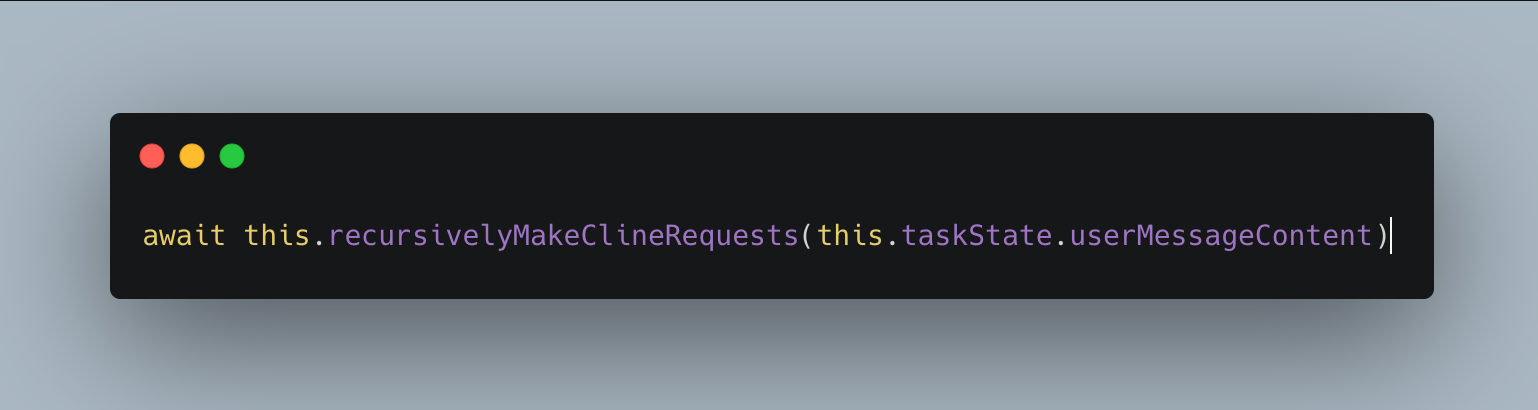
The conversation loop is implemented in recursivelyMakeClineRequests(). method. As the name implies, it recursively makes API requests until the task reaches completion:
Let’s trace through a real example — creating a web server:
User: Create a Python web server with a hello endpoint
Iteration 1 - Create the Server File:
Assistant: I'll create a Python web server using Flask.

<write_to_file>
<path>server.py</path>
<content>from flask import Flask
app = Flask(__name__)

@app.route('/hello')
def hello():
    return 'Hello, World!'

if __name__ == '__main__':
    app.run(debug=True, port=5000)
</content>
</write_to_file>

[Cline executes, file is created]

Tool Result → Next User Message:
## Tool Use: write_to_file
Result: File created successfully
Iteration 2 - Handle Missing Dependency:
Assistant: Now let me run the server to test it.
<execute_command>
<command>python server.py</command>
<requires_approval>false</requires_approval>
</execute_command>
[Cline executes]
Tool Result → Next User Message:
## Tool Use: execute_command
Result: Error: ModuleNotFoundError: No module named 'flask'Iteration 3 - Fix Error and Complete:
Assistant: I need to install Flask first. Let me do that and then verify the server works.
<execute_command>
<command>pip install flask && python -c "from flask import Flask; print('Flask installed successfully!')"</command>
<requires_approval>false</requires_approval>
</execute_command>
[Cline executes]
Tool Result → Next User Message:
## Tool Use: execute_command
Result: Successfully installed Flask-3.0.0... Flask installed successfully!Through this looped approach, Cline is able to identify problems, propose and execute fixes, and continue progressing through the task — all without the user needing to intervene after the initial prompt.
Context Management: Fitting Big Codebases into Small Windows
One of the biggest challenges in building an AI coding agent is dealing with the context window limitation. How do you help an AI understand a 100,000-line codebase when it can only “see” 200,000 tokens at once?
How Cline Manages Context
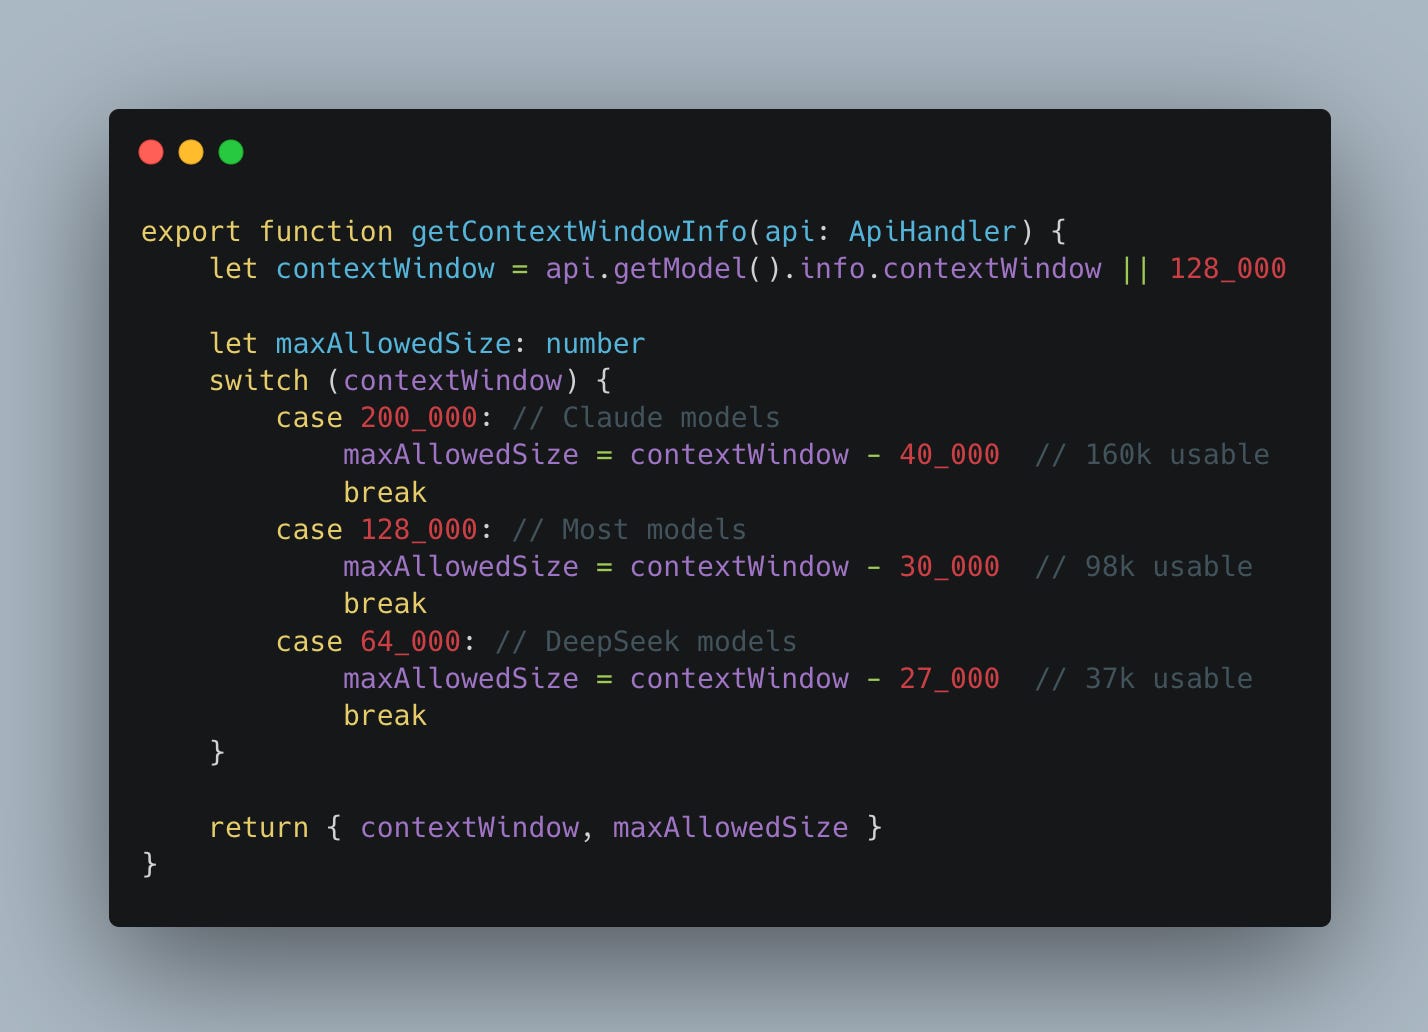
Step 1: Context Window Calculation
Cline calculates safe token limits for each model in order to avoid overloading the context window:
Step 2: Continuous Context Tracking:
During each API request, Cline actively monitors token usage to stay within safe bounds:
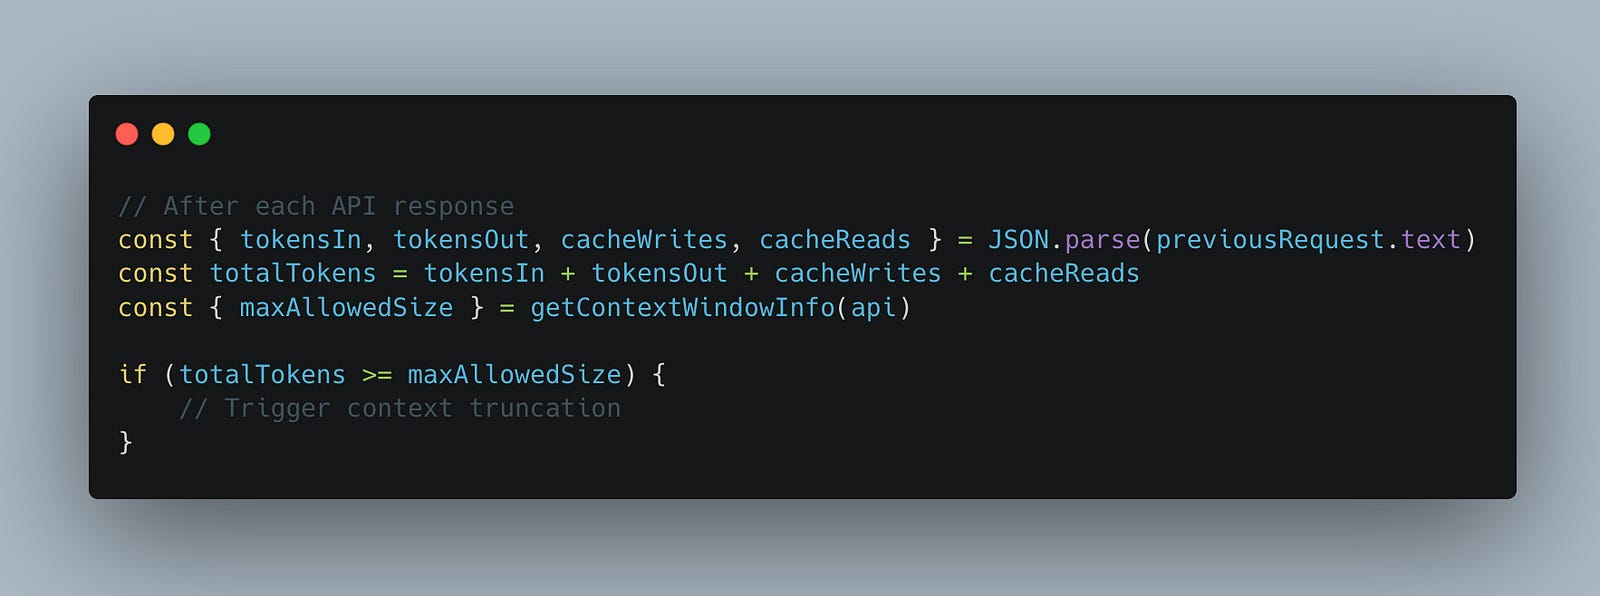
Step 3: Truncation Strategy
When the context size approaches the limit, the ContextManager applies a truncation strategy to remove older or less relevant messages:
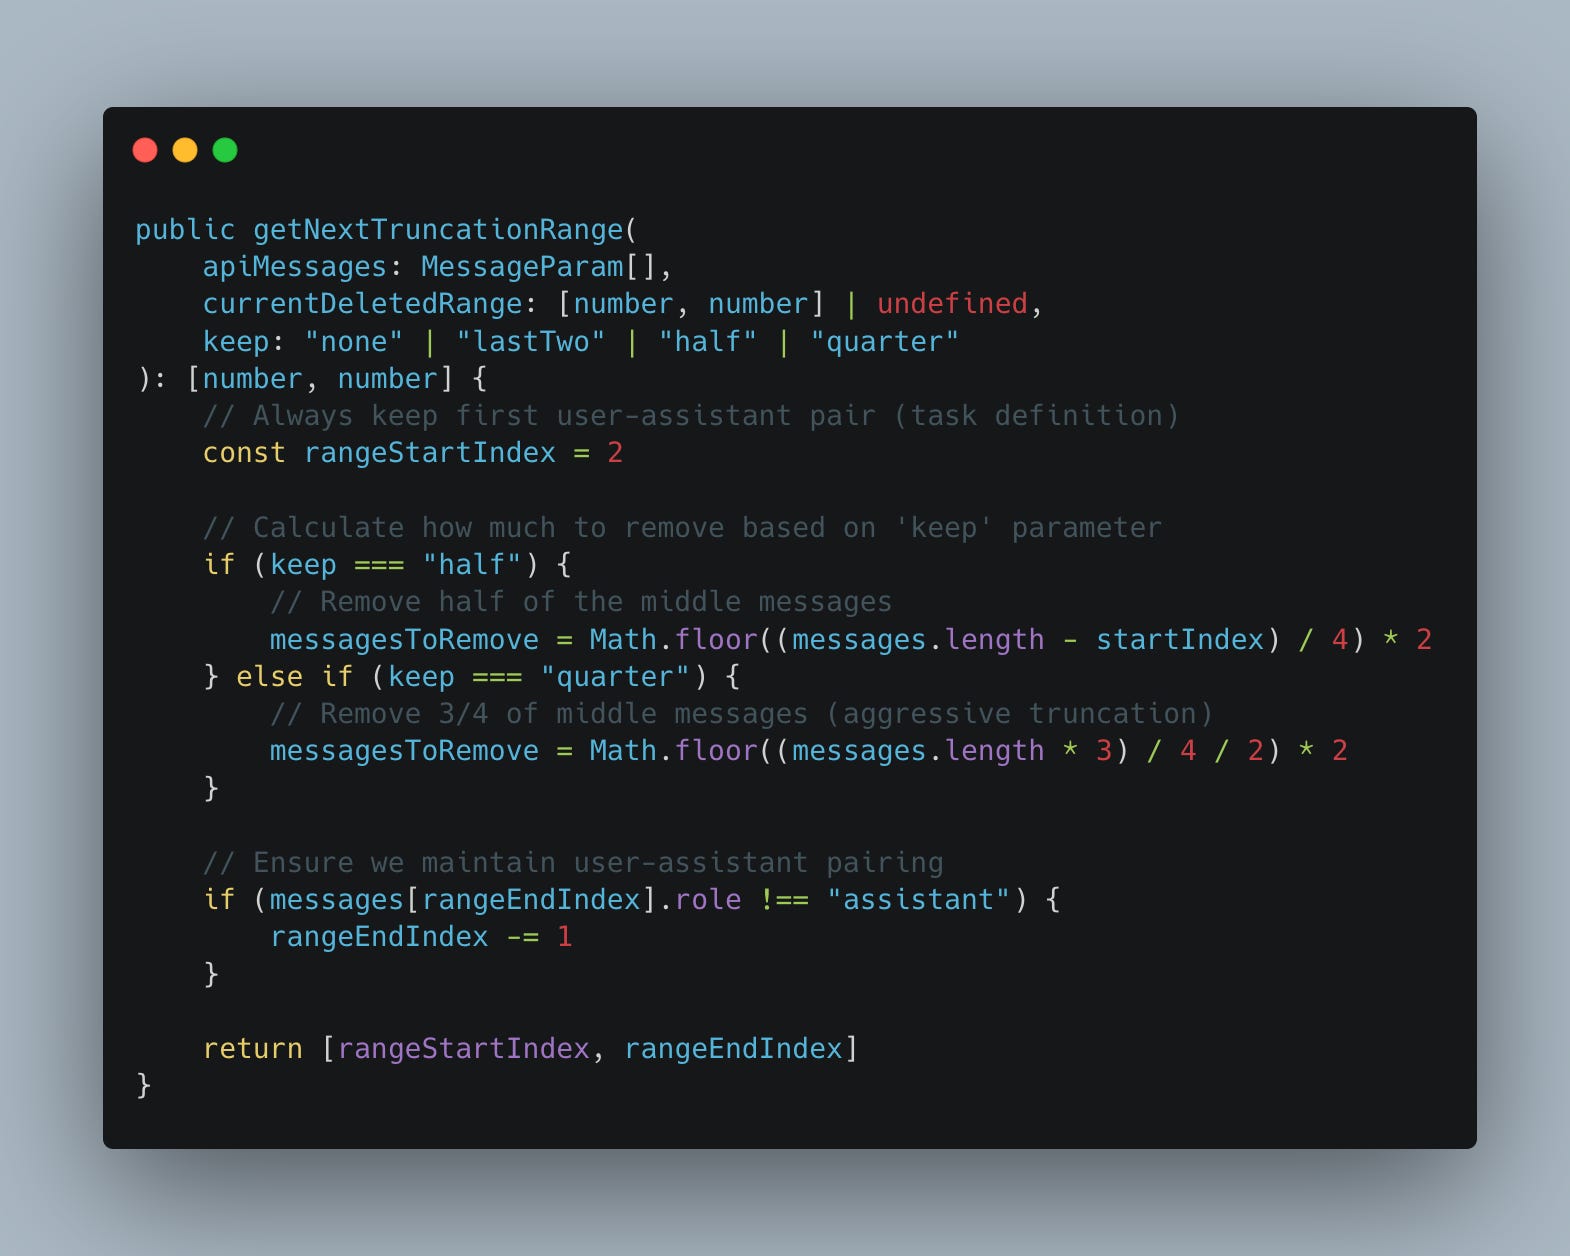
For example, if getNextTruncationRange returns [2, 5], the messages at indexes 2 through 5 will be removed from the conversation array to make room for new context.
While this article doesn’t explore every detail of Cline, it should give you a solid understanding of how a production-ready AI agent is implemented — from context handling and tool execution to autonomous decision-making through conversation loops.
💡 Want More Tools to Help You Grow?
I love sharing tools and insights that help others grow — both as engineers and as humans.
If you’re enjoying this post, here are two things you shouldn’t miss:
📅 Substack Note Scheduler — This script allows you to schedule Substack Notes using a Notion database. Basic coding experience is required to set this up. It is free to use :)
📚 Everything I Learned About Life — A Notion doc where I reflect on lessons learned, practical tools I use daily, and content that keeps me growing.
👉 Find all resources (and more) here: Start Here
Thank you for writing this, I was looking for some of the bells/whistles of the wrapper tools like Cline and this was just perfect